
If you'd like to try your hand at communicating with spirits, you don't have to head out to your nearest toy and game store for a talking board. Instead, you can make your own Ouija board and planchette using a simple design. With your DIY Ouija board, you'll be ready to communicate with spirits in no time.
Pattern to Make Your Own Ouija Board
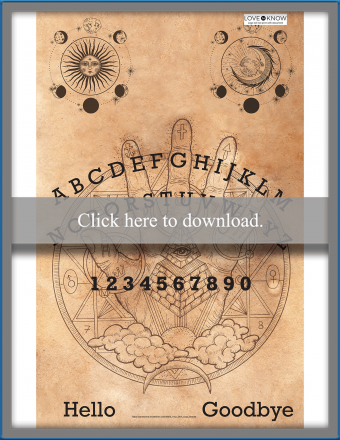
Can you make your own ouija board and will it work? Yes! You can learn how to make a ouija board with a complete pattern and design, including the planchette. To do this Ouija board DIY, click on the image to pull up the pattern and then print. One page has the full board and the full planchette. You can use additional pages on the pattern as elements to create a larger Ouija board. If you need help, consult the Guide for Adobe Printables.
Materials
- Printed Ouija board and planchette design
- 1/4 inch wood piece, cut to 11x14 inches with edges sanded smooth
- Thick cardboard
- Decoupage medium, such as Mod Podge
- Felt adhesive circles, such as SoftTouch Self-Stick Furniture Pads
- Foam craft brush
- Scissors
- Pencil
- Plastic painter's pyramids
Instructions
- Print the designs for the Ouija board and planchette. Cut out the planchette design.
- Place the wood piece on a work surface and brush on a thick layer of decoupage medium. Carefully place the printed board design over the wood piece, lining up the edges. Smooth out any air bubbles with your hands. Allow this to dry to for about half an hour while you work on the planchette.
- Place the cut-out planchette design on the cardboard and trace around it with a pencil. Repeat this process so you have two identical cardboard planchette shapes. Apply a layer of decoupage medium to one of the cardboard pieces and line up the two pieces to glue them together for a thicker planchette.
- Apply another layer of decoupage medium to the top of the cardboard planchette and place the printed planchette design on top, lining up the edges. Smooth out any air bubbles and set it aside to dry for half an hour while you go back to working on the board.
- Liberally brush decoupage medium over the board, making sure you cover the edges well. Smooth out any drip marks with your brush. Work to keep the surface smooth.
- Return to the planchette, brushing decoupage medium over the entire surface, front and back. Set it up on painter's pyramids to allow both sides to dry.
- Alternate between the board and the planchette until you have applied four coats of decoupage medium to each. Allow them to dry thoroughly for 24 hours.
- When the planchette is dry, put three self-adhesive felt pads on the bottom to act as feet and allow it to glide smoothly on the board.
Variations
Use the extra designs included in the printable or some fun art supplies to customize your Ouija board even more. Try these ideas:
- Make a larger board by including the extra printed elements around the edges of a larger piece of wood.
- After you've pasted the paper printable to the wood piece, use paint or markers to add color elements to the design. Allow the art to dry and then apply the decoupage medium as usual.
- Paint or stain the edges of the board a contrasting color before applying the decoupage medium.
- Paint or stain the back of the board for a pretty touch.
- If you're handy with power tools, use a jigsaw to cut the planchette out of wood instead of cardboard.
Playing
Follow traditional Ouija board rules and guidelines for use. A few tips:
- Create a safe play space for using the Ouija board.
- Only have two people with their fingertips very lightly on the planchette. The touch should be so light you can slip a piece of paper underneath the fingers with little resistance.
- Have one person not touching the planchette write down the letters as they are spelled.
- Ask the right types of questions.
- Also know which questions to avoid with a Ouija board.
How to Make a Paper or Cardboard Ouija Board
For your DIY Ouija board, it doesn't need to be so fancy or complex. For a quick and easy disposable ouija board, create the board design on a piece of paper or cardboard and tape it securely to the surface you'll be using. Then, turn a glass upside down to use as a planchette. You can also place the paper or cardboard underneath a flat sheet of clear plexiglass or secure it to the table by placing clear contact paper over the top and use your upturned glass as a planchette. The plexiglass or contact paper will protect the paper and allow the glass to slide more smoothly. You'll play the paper or cardboard Ouija board in the same way you would with any other.
How to Make a Spirit Board
A spirit board is essentially a Ouija board by any other name. You don't need to use an official Ouija board design to create a spirit board. Use any placement of letters, yes or no, good-bye, and other design elements and you have a customized spirit board.
How to Design Your Own Ouija Board
Many people think that the design of the Ouija board itself is what makes it work. In fact, most Ouija board experts recognize this isn't the case at all. It seems most of the energies or power of the board come from people, so the design itself has very little impact on whether the board will work. However, there are a few basic guidelines to follow if you want to make your own Ouija boards. These guidelines will ensure your board works properly. Beyond the basic design, you are free to add additional images or features as you see fit.
There are a few basic design features that you'll need to include in your Ouija board design in order for it to work properly.
Add Letters and Numbers
In 1891, Charles Kennard developed one of the first major versions of the Ouija board in the United States. The board was simple with letters in the middle, numbers underneath, the words "yes" and "no" lettered along the top and "GOODBYE" at the bottom. It also featured a few very simple designs sparsely decorating each corner of the board. Any basic Ouija board today should, at a minimum, provide all letters of the alphabet, all ten numerals and those three words for basic communication.
Wood Works Best
While some people create Ouija boards out of various materials, including cardboard, many occultists believe wood is the best material to use because it retains Earth energy that serves to focus spiritual energies and foster more effective supernatural communication.
Embellishments Aren't Necessary
The designs that adorned each corner of the original Ouija board in 1891 are not critical to the functioning of the board. However, many people believe symbolism is a strong element of the spirit world, and that the moon, crescent, and stars are helpful in channeling spiritual communication.
Make Sure It Has a Smooth Finish
Another critical element of a very active Ouija board is that the planchette that rests on top of the board needs to be able to glide effortlessly and smoothly across the surface of the board. This means after stenciling the designs on the face of the board, you should apply a good clear coat finish, or even a thin glass sheet, over the face of the board.
Add Your Own Unique Touches
In addition to designing your Ouija board using those basic features, you can also add additional touches that won't impact the functioning of the board.
- Try different pictures and designs: Ouija boards throughout the decades were produced with a wide variety of patterns and even images on the face. Today, people are used to the standard and well-known Parker Brother's Ouija board design. However, a few other designs throughout the years included Magic Marvel from the 1940s, Rajah featuring elephants and snake charmers, and even the Mystic Board from the 1940s featuring interesting Egyptian designs. You can apply your own designs, such as your zodiac signs or anything else that's meaningful to you, and the board will still work just as well.
- Use old wood: Another theory is that because wood provides the board with Earth energy in order to channel spirit communications, boards built from the wood of very old trees tend to hold more residual energies and wisdom that many believe help generate a much more active Ouija board than would otherwise be possible.
- Try different words: Another interesting tactic many contemporary board designers use is to customize a board based on the spirit they are communicating with. For example, if the spirit of a little girl mentions a "toy" often, some board designers may customize a board with the word "toy" on it. You can include as many words as you can fit; just make sure to leave enough room for the planchette to glide over it easily so the word will display in the indicator window.
- Find a planchette that glides: The device that people place their fingertips on that glides across the face of the board is a little more difficult to design. You could create your own using a small regular shaped or pointed piece of wood. Cut a hole in the center for viewing, attach four small legs and place felt pads on the feet to avoid scratching the board. Use the lightest wood you can find for best results. Another option is to use the planchette out of an old store bought Ouija board. Some people even use an overturned shot glass in place of a planchette.
Will a Homemade Ouija Board Work?
There's no reason why a homemade Ouija board wouldn't work in the same manner as a purchased one as long as you create a lightweight planchette that slides smoothly along the board's surface. Regardless of which design you choose for your customized Ouija board, just be sure that before you use the board that you understand how it works and what's involved with communicating with the spirit world. There's a great deal of debate surrounding the safety of such communication, so it's always better to educate yourself first. Creating a Ouija board design that reflects your own interest and tastes can give an additional sense of energy and a personal touch into the process of communicating with the spirit world.


